Anyone that knows me that cooking is not my strong point...to say the least. I think a lot of it has to do with my lack of planning. Granted, you're not going to catch me preparing any gourmet meals anytime soon. But I do have a handful (and I do mean a handful) of recipes I can prepare excellently. However, I never seem to have the right ingredients on hand so we end up having sandwiches or cereal. Again. I've tried meal planning before, but it always seems like so much work trying to decide what to make.
But then last summer my friend Megan made a super cute menu board, and I knew it was exactly what I needed to kick me into gear. I was so excited and planned on making it within the next week or so. I even bought the frame I would use, and left it sitting out in my laundry room in hopes it would motivate me to get started on this project. Instead, it just got in the way and cluttered things up. When will I learn? Needless to say, something about the new year has gotten me on a craft kick, and I decided last week was the time to get started on the menu board.
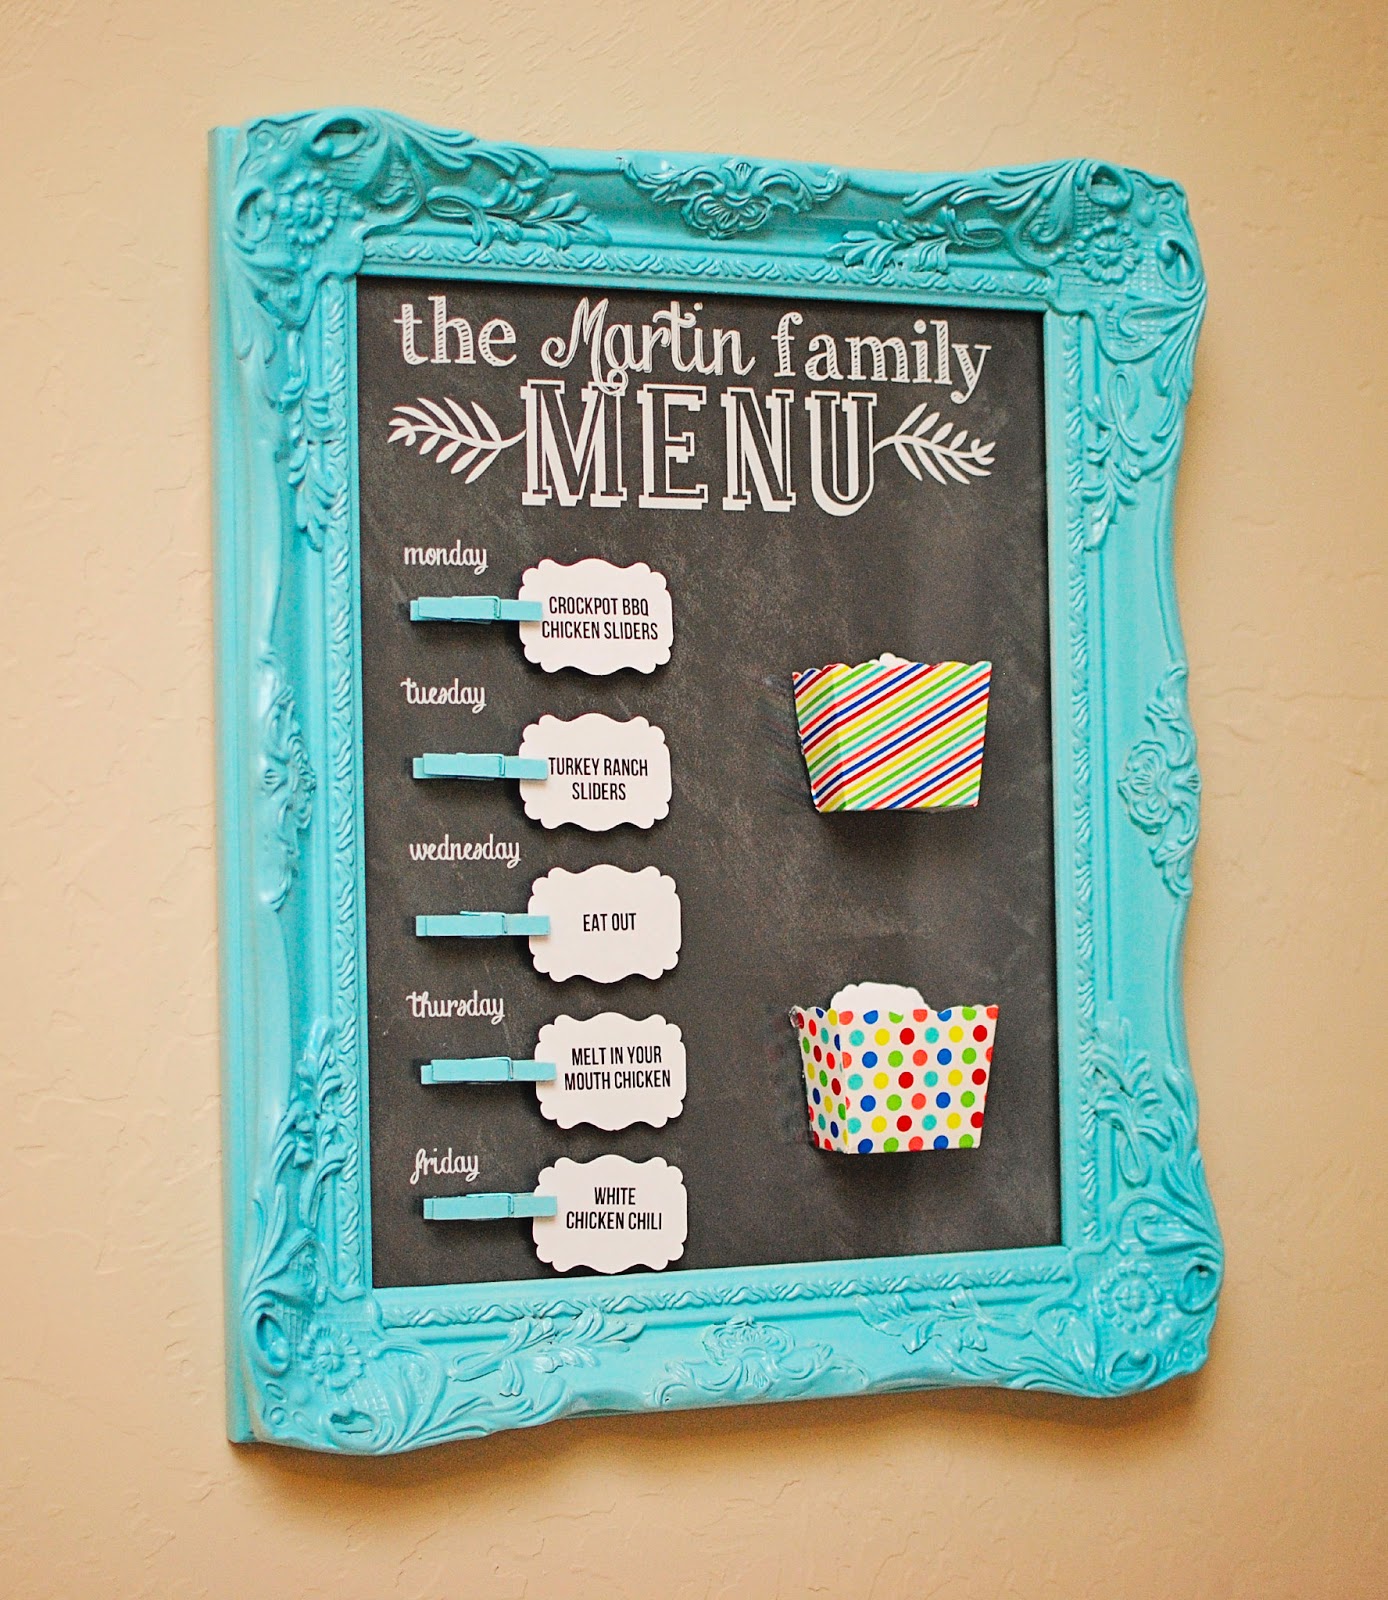
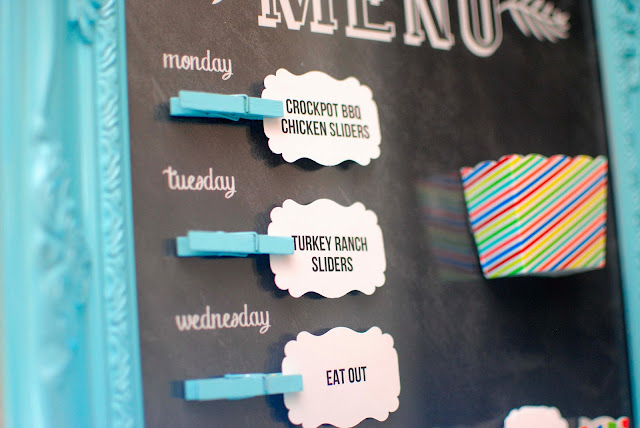
I love the concept behind this menu board because I think it will be easy and practical to actually use and organize our weekly meals. Basically you make meal cards listing all of your regular meals, and then you can just pull the cards out when you're planning for the week. I can never remember the 5 things I can make, and now they are right in front of me, so no excuses! You can visit Megan's blog here for a full tutorial of how to make one with one quick trip to the craft store. I did my version a little different than hers, so read below for details.
Here's what I used:
--11x14 frame (mine was off-white from Hobby Lobby but I spray-painted it Ocean Mist, also from Hobby Lobby)
--Mini Clothespins (also can be purchased from Hobby Lobby or The TomKat Studio - I spray painted these too)
--Hot glue gun & glue sticks
--Cups or boxes to hold menu cards
--Paper Punch (optional) purchase at Hobby Lobby or The TomKat Studio
--Menu background printable (below)
1. Download the Menu printable here. You can have it printed as an 11x14 print 1-hour at SAM'S or Costco for just a couple dollars. Other photo places will print this size but I don't know of any that will do it in 1-hour service. (If you are interested in a printable personalized with your name, you can purchase it in my etsy shop here.)
2. Place printable in frame. Using your hot glue gun, glue the clothespins on to the glass in the appropriate place.
 3. Next, glue your card holders on to the glass. I made this one day when I was sick and didn't feel like leaving the house, so I just looked around to see what I could use. Luckily I'm a hoarder and had these snack cups from Target that I decided would be perfect. I cut them in half, reinforced the bottom with some packing tape, and glued them to the glass.

Today I am sharing this with the following lovely ladies!
Winter Project Challenge
Monday Funday
Craft-o-Maniac Monday
Frugal Crafty Home Hop #6
But then last summer my friend Megan made a super cute menu board, and I knew it was exactly what I needed to kick me into gear. I was so excited and planned on making it within the next week or so. I even bought the frame I would use, and left it sitting out in my laundry room in hopes it would motivate me to get started on this project. Instead, it just got in the way and cluttered things up. When will I learn? Needless to say, something about the new year has gotten me on a craft kick, and I decided last week was the time to get started on the menu board.
I love the concept behind this menu board because I think it will be easy and practical to actually use and organize our weekly meals. Basically you make meal cards listing all of your regular meals, and then you can just pull the cards out when you're planning for the week. I can never remember the 5 things I can make, and now they are right in front of me, so no excuses! You can visit Megan's blog here for a full tutorial of how to make one with one quick trip to the craft store. I did my version a little different than hers, so read below for details.
Here's what I used:
--11x14 frame (mine was off-white from Hobby Lobby but I spray-painted it Ocean Mist, also from Hobby Lobby)
--Mini Clothespins (also can be purchased from Hobby Lobby or The TomKat Studio - I spray painted these too)
--Hot glue gun & glue sticks
--Cups or boxes to hold menu cards
--Paper Punch (optional) purchase at Hobby Lobby or The TomKat Studio
--Menu background printable (below)
1. Download the Menu printable here. You can have it printed as an 11x14 print 1-hour at SAM'S or Costco for just a couple dollars. Other photo places will print this size but I don't know of any that will do it in 1-hour service. (If you are interested in a printable personalized with your name, you can purchase it in my etsy shop here.)
2. Place printable in frame. Using your hot glue gun, glue the clothespins on to the glass in the appropriate place.


4. Write or type out the items you want to include on your meal cards. I printed mine off on cardstock, and cut them out with a 2" punch I had from Hobby Lobby. You could also just cut them out in a square, but this was actually quicker and easier for me - especially since I am the world's worst cutter.

5. Place all your cards in the holders, and when you're ready to meal plan simply go through the cards and choose your meals for the week!
A few things to note:
--I just did Monday through Friday because those are the only days I cook (on a good week).
--Megan suggested making notes on the back of the cards of key ingredients for that recipe you may not keep on hand, and that way it makes it easier to know what to put on your grocery list.
--I made a "leftovers" and "eat out" card because realistically, those will be used at least one or two times a week. I did, however, resist the urge to make 5 "eat out" cards.
--I punched out several blank pieces of paper so I can write in new recipes to try. If we like it, I'll print it out so it can "officially" go into our regular rotation.
So we will see how this goes! Last week was my first time using it, and I loved it so much. Organization just makes my heart happy. Hopefully I can stick with it! :)
Today I am sharing this with the following lovely ladies!
Winter Project Challenge
Monday Funday
Craft-o-Maniac Monday
Frugal Crafty Home Hop #6


So cute! Where did you get your chevron rug??
ReplyDeleteThanks friend! It's from Amazon. Just search chevron rugs - I got it for around $75 and it's 5x7. I've heard the price has gone up a little though. I've also heard Rugs USA has similar ones and you can often get a discount code there. Hope that helps! :)
DeleteWhat a cute idea! We just have a printed weekly calendar with whatever I'm cooking written in. This is SO much better than that!
ReplyDeleteThis is a great idea!!! I'm wanting to make a Command Center (baskets, calendar, dry erase board, etc) behind the door that separates the kitchen from the laundry room. This would be a great addition :)
ReplyDeletePS I got mega compliments on the planner-- thx for sharing your awesome ideas!!!
This is absolutely adorable! Love all the bright colors! I'm totally with you I'm not very good at meal planning! I've tried many times before and am just a bad planner in general! My husband is the planer. Thanks for sharing this over at a Frugal Crafty Home! I'm definitely using this as one of the highlights from this week hop!
ReplyDeleteIt's adorable! I love that chalkboard font! I meal plan weekly already and I've been wanting to make one but I'm worried it will be another thing to keep up with. It's so cute though!
ReplyDeleteLove this! The colors are wonderful, especially the teal! Great idea. I need something like this in my kitchen.
ReplyDeleteThis is the cutest idea ever! Like I want to go to Michaels right now and make one cute lol! I told the hubs I am gonna be operation organazation this year and I am for sure putting this on my list! Thanks for sharing! You are super cute and so is your blog!
ReplyDeleteSo cute, girl...and I love the color!
ReplyDeleteLOVE this!!! Just added it to my "to do" list for this weekend. This will come in handy when baby girl gets here and I really can't remember what the heck I'm doing. Ha
ReplyDeleteI LOVE this! We've gone from a family of four to seven this year and the kids are always asking "what's for dinner?" Now having five kids asking that question, I finally decided that I just need to make a menu board so that they can look there to find out instead of asking me. Thanks for posting!
ReplyDelete~Sarah
So cute, Sarah! I shared on Facebook last night and everyone loves it! We sell that paper punch + the mini clothespins in our shop, if anyone has trouble finding them!
ReplyDeleteOh I LOVE this!! You are so creative!
ReplyDeleteAwesome !!! Thanks for sharing Sarah !!! I'm not the best planner either so this may be something I give a try :)
ReplyDeleteThis is darling! I was just thinking of making something similar, but with magnets... I sure love this version!! I would love if you'd come link up to Foto Friday on my blog.
ReplyDeleteThanks for sharing. Newest follower here from Big Red Clifford!
This is a great idea. I might do something similar in my kitchen. You have inspired me. I am hosting a new link party if you would like to link up.
ReplyDeletehttp://www.ifitsnotbaroquedesignblog.blogspot.com/2013/01/tuesday-link-party-2.html
I was just telling my fiance that we really should get a menu board up - you know since I'm trying to de-bachelorize his place ;) I WILL be making this! :) Thanks!
ReplyDeleteI love this idea! I want to make one for my kitchen, but how do I add our last name like you did?
ReplyDeleteJen Mitchell
Hi Jen!
DeleteYou can purchase the listing for a custom file for $3 in my etsy shop here: https://www.etsy.com/listing/120445895/digital-meal-planning-name-chalkboard
Thanks! :)
Sarah
That's awesome!!
ReplyDeleteLove the colours too :)
Here's the one I made, it's very simple and I can use it for other things besides a menu.
http://allmylovemommy.blogspot.ca/2012/12/nye.html
This is SO cute!! And such a great idea for organizing your weekly meal plans!! I love it!! Thanks so much for sharing & for linking up to the "Organize It" challenge!!
ReplyDeleteThank you so much for sharing - really appreciate it. Came from pinterest
ReplyDeleteLove this! Thanks so much for sharing. I was wondering if you had the file saved that you printed the meal ideas? I'm going to make this but really need ideas for meals. Let me know, thanks!!
ReplyDeleteUnfortunately I didn't! ! I don't know what I was thinking not saving it. So sorry! :(
DeleteThis is gorgeous! I'd love for you to link up to the Pinworthy Projects party! http://www.atkinsondrive.com/pinworthy-projects-link-party-week-6/
ReplyDeletewhat a great idea. pinning it!
ReplyDeletewhat a great idea. pinning this!
ReplyDeleteThis is so cute! I love that it looks like a chalkboard, but isn't! :)
ReplyDeleteI really like the size and shape of the menu card, what is the name of it?
ReplyDeleteClothespins keep falling off with hot glue. Any tips to get them to stay?
ReplyDeleteHmm...I haven't had any issues with mine...I just glued them with regular hot glue. Make sure your hot glue gun isn't a low temp one as maybe that could be causing it? Otherwise I would try a different type of glue - maybe E6000? Good luck! :)
ReplyDeleteI love everything about this projects. :) Just found you via Pinterest. I will definitely be stopping by a lot. :) XOXO
ReplyDeleteYou are so sweet...thanks so much! xo
ReplyDeleteGreat idea, you coan also look the solution with paint board at http://www.lovediy.it/guide/come-fare-la-vernice-lavagna/
ReplyDeletethis is so cool!! Found you through aninvitinghome blog:) Subscribed to your blog! love your ideas & creativity!
ReplyDeletea new fan,
Joey
You are so sweet!! Thanks so much for the kind words and for stopping by. :) xo
ReplyDeleteWhat brand spray paint did you use for this? I absolutely love this color but can't find the color "Ocean Mist" anywhere!
ReplyDeleteHi there! The brand is Krylon and the color is Blue Ocean Breeze. I got mine at Hobby Lobby. Hope that helps! :)
ReplyDeleteHi, I was wondering if you had a menu printable with Saturday and Sunday as well? Thanks!
ReplyDeleteYour all
ReplyDeleteexplanations are meaningful in this blog. I love reading this.
umrah visa