August 27, 2009

Fragmented Friday Freewrite

“ I don’t talk trash; I talk smack. They’re totally different. Trash talk is all hypothetical like ‘Your Mama’s so fat she could eat the internet’ but smack talk is happening like right now, like you’re ugly and I know it for a fact cause I got the evidence right here."
-Kelly Kapoor, The Office


Would you judge me if I told you a small piece of me wants to buy this shirt?


______________________________________

Why? Why do I have to be the one to try to be funny? Or say something to fill the silence? This s the story of my life.
SARCASTIC COMMENT????? Pictures, Images and Photos
It's back to school time (I work at a university), so we had an orientation (or as they say on The Office, more like booorientation) to go over all the normal stuff & meet the new faces in our college. Well, as an introductory activity, the dean had us go around and introduce ourselves, say what we do, and then answer the question: "Do you think you are paid what you're worth?" Wow. Really? That's awkward. When he said it, there was a bunch of nervous laughter. So it started around the room and most people gave the generic, "I love what I do so it doesn't matter blah blah blah." Well, you know me, I can't just say something normal. So next thing you know, I'm up to bat and say, "Well I'm just a little shocked to hear all of y'all are getting paid...I thought this was a volunteer position." As soon as I said it I thought, what have I done?! Fortunately they all laughed and appreciated my quick wit. But still. I should work on giving cookie-cutter answers and not trying to be the class clown.
______________________________________
I will leave you with this little pearl of wisdom: think twice when naming your pets.


Happy weekend, friends! :)

Saltine Cracker Toffee Bars

As soon as I saw the recipe for these on Dusty's blog yesterday, I took the rest of the day off work so I could rush home and make them knew I would be making them in the near future. And when I say near future, I mean within 8 hours - tops.

Believe it or not, I didn't plan for it. I didn't go to the grocery store to specifically buy the ingredients. No, it just happened. Kinda like when you trip and all the sudden you're like, 'woah - what happened?' And you're all dizzy and discombobulated.

Anyway, we'd just finished dinner and these little bits of (what I knew would be) yummy goodness were still lurking in the back of my head like that high school math teacher watching to make sure you don't cheat. They just don't go away until you finish what you started. So I started thinking, and realized I had all the ingredients in my kitchen already. I know what you're thinking - all the ingredients? Sarah, there are only 4 basic ingredients. Come on. This is true, but anyone who knows me knows my kitchen supplies are pretty barren. I'm not the best at keeping miscellaneous supplies on hand because then I end up making things like this too often. Anyway, I had to improvise a little because we only had wheat crackers and Splenda brown sugar, but wow - I was still very pleased, to say the least.

So now that I've prattled on (how do you guys feel about that word - prattled? It's a little odd, no?) here's the fab and E-A-S-Y recipe. Go to Dusty's blog for step-by-step pictures if you're a visual cooker like myself. And I'd like to curse her for the 5 pounds I gained last night thank her for sharing this recipe!

What You Need

Saltine Crackers

1 c. Butter


1 ½ c. Brown Sugar

Chocolate Chips


1. To start, preheat oven to 350 degrees.

2. Next, grease a cookie sheet or jelly roll pan, and then lay out your saltine crackers in a nice orderly fashion.

3. Next, boil butter and brown sugar in a saucepan for 3 minutes, stirring constantly. I like to melt the butter and brown sugar over medium heat until it's all melted and stirred together, and then I crank it up to high heat and boil for 3 minutes.

4. After you've boiled for 3 minutes, pour mixture over your pan of saltine crackers.

5. Spread it around nice and evenly.

6. Bake at 350 degrees for 4 minutes.

7. Remove from oven and top with chocolate chips.

8. Spread chocolate chips while still warm. It may not look pretty, but oh my goodness it tastes so good!

9. Let them cool on the counter for a few minutes and then cut them along the lines of the saltine crackers so one bar is the size of one saltine cracker. After they're cut, put them in the fridge to cool completely.

Here's a picture of some I brought to work in a Zip-Lock bag so I can eat them throughout the day share them with others.

Now go make some. Then call me when they're ready and I'll come over to help you eat them.

August 25, 2009

{Mostly} Wordless Wednesday 5


We are fortunate to have a great view from our back veranda. It was really foggy the other morning, so I snapped a few pictures. God's creations never cease to amaze me!! :) (Please ignore our unruly backyard. That is not God's doing, but rather us not doing.)


Back to School Blues

As some of you know, I used to be a 2nd grade teacher. Let me give some background here since you're all dying to know.

Out of college, I primarily worked in corporate marketing. Then when we moved for Patrick's job, I decided to do something I'd wanted to try (thanks to my sister Jenny) - teach. So back to school I went to get my Alternative Teacher's Certification. We were in Texas at the time, and the program I went to was great and only lasted about 6 months. So before I knew it, I was in the classroom! My first job was in 2nd grade, and I loved it. I stayed there for a couple of years, and then we decided to move so Patrick could settle somewhere with his job. We moved just after the school year had started, so there weren't any teaching jobs available. Yes, I had known we were planning on moving, but hadn't actively been seeking a job because....well, because we had "planned" on me staying home with "our baby". However, since said baby hadn't materialized yet, we decided {a little too late for teaching} that I would continue working. So after substituting for awhile and making 10 cents a day next to nothing, I decided to look for a job where I could put my marketing skilllzzz back to work. So that's what I'm doing now, and will continue to do until we bring Baby Martin home.

Yikes - that was long. Shocker. Anyway, the point of this post is...with all the back to school activity going on right now, I'm really missing teaching! I've seen several blogs posting pictures of their classrooms all ready to go, so I thought I'd take a stroll down memory lane and share some pictures from my old classroom. (Which, as it turns out, I don't have near as many good pictures as I wish I did, and there are several things I wish I had pictures of that apparently I never photographed...I MUST get better about this!)

Moving right along...our school required the teachers to decorate their rooms using more of a "home decor" theme - no bright colors, warm & inviting, etc. While at first it took some getting used to, I came to love my room & the basic green & brown theme I decorated in. Welcome to my room!
Here is a close-up of the library area. The green couch you see on the left side of the picture? I scored that for free on the side of the road! Of course I had it thoroughly cleaned, but it was perfect for my kiddos to hang out on and enjoy a good book. :)

Here are the cubbies, Word Wall, & my organizational area. The baskets on the left were labeled as follows: Marvelous Monday, Terrific Tuesday, Wonderful Wednesday, Tremendous Thursday, and Fabulous Friday. (The color system also assisted in another classroom management piece, but I won't bore you with that.) When preparing for the week, I put all the necessary lessons and materials for each day in the basket. A little time spent at the end of the week doing this allowed for a much smoother week the following week!
This served as a supply area, and you can also see our class fish Tuna on the left. The drawers are from Ikea & I painted them brown and labeled them with supplies we often used. There were also two pencil cups labeled sharp & dull. At the end of each day, the "pencil monitor" would sharpen all the dull pencils and place new pencils in the student's pencil spots (an 8 inch piece of trim that had a ridge in it - pencil rested perfectly in it.) This kept the pencil sharpener from whirring all day...a personal pet peeve of mine! :)
Here is a close-up of the job wheel & the descriptions of each job so students could review their job as necessary.
Here is our Math Meeting Board, where we started every day.

Homeworkopoly was a favorite with the kiddos. If they brought their homework back every day, on Friday they got to roll and move their piece around the gameboard.


Organization was something I really tried to teach & assist students with. One piece of that was through a folder I created for them (why don't I have any actual pictures of this?!) called a B.E.A.R., which stood for Being Efficient And Responsible. The cover looked like this:

The inside contained a couple of sheet protectors with the week's assignment sheet, spelling list, behavior log, and a monthly calendar, including the cafeteria menu. I also put labels on the left & right side to help them remember what needs to come back to school, and what could stay at home.


We didn't have class rules necessarily, but practiced Lifelong Guidelines & Life Skills. We also featured a word of the week & quote of the week about that word. This helped reinforce the Life Skills & it was so neat to hear the students incorporate these words into their vocabulary.

Student of the Week was a BIG DEAL in our room. Aside from getting to take Bentley (our class mascot from Build-a-Bear) home, they also got a special chair cover and a few other privileges. I made (& laminated) this poster for the students to fill in information about them.

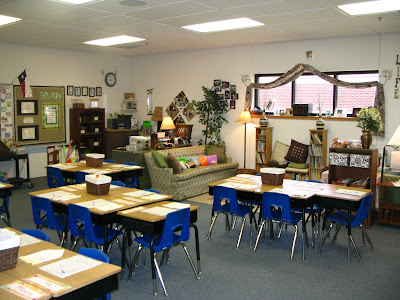
One of the jobs of the Student of the Week was to change out the agenda board every day. This helped keep the kiddos on track and avoided the, "Mrs. Marrrrtin, what are we doing next??"

Here are some letters I painted to add some subtle color to the room. :)


Here are all 18 of the Life Skills we focused on framed.

One of the student's favorite activities was to perform contraction surgery! It really helped them understand how contractions are formed.
This is another "I wish I had a better picture!!" or actually in this case, a picture at all. This is not even the final version of it - I must have done the final on my school computer! Ugh. So here is a shot of the pdf, b/c that's all I have at this point. I had the students lay in the shape of letters and took pictures to make a custom thank you card to give to those who volunteered in our class or sent materials for an experiment, etc.

To help others be able to easily find our class, we were to display some type of sign outside the door. I designed & laminated some, and put Velcro strips on the back so they could easily be switched out (job for Student of the Week). The main piece says "We have gone to" and the bottom part is interchangeable.
Here are some of the signs for when we weren't in class:

I used a "Classroom Economy" model for my behavior system. As part of it, I made each student a "checkbook" with a ledger to keep track of their debits and credits. The class store would open every other Friday, and they could spend (or save!) their money on items or privileges.
Well that is enough for now but wow that was really long!! Thank you for indulging me. This little stroll down memory lane has been very therapeutic for me. Perhaps it will give me my teaching fix for awhile. Especially when I see pictures of some of those sweet faces that....well, if you've ever been a teacher...you can finish the sentence. :)


August 24, 2009

Free {FUN} Printables!

I love all things paper. Notepads, cards, notebooks...I'm a stationary junkie. So when I see someone giving away amazing designs, I naturally get a little giddy! Thus was the case when I stumbled upon these lovely jewels.

I recently found the blog Vale Design, and can't remember for the life of me how I came across it...but I LOVE it! She has an etsy shop where she sells many great DIY printables, and she also shares so many great freebies on her site.

Check out this one...I am so making a set of these! Go here to download them...scroll down just under the picture and you'll see the download link in tiny print.

Go here to download this fun grocery list.


And go here to download these hilarious lists!

Another great site with DIY printables is my sweet friend Kim at The TomKat Studio! I have long been a fan of Kim's work, and she recently started offering a DIY line. You can now purchase DIY printables of her creations in her etsy shop for an incredible price!

She is sharing a free download to these precious thank you cards...just in time for back to school gifts for the teacher! :) Go here to download them.

She has also started posting a fun printable calendar for each month. Go here to download August's, and be watching her blog as I'm sure she'll be posting September's soon!

Thanks to both of these incredibly talented ladies for sharing their wonderful creations with us! :)

August 21, 2009

Fragmented Friday Freewrite

A couple of months ago I was in Wal-Mart and saw a desktop calendar featuring a quote a day from "The Office"....my all time favorite show! AND it was on sale for 3 bucks...if that's not better than Christmas morning, I don't know what is. Anyway, the first thing I do every morning when I walk in my office is tear off the previous days quote so I can read the one for that day...because, really, is there a better way to start your day than with some Office greatness? I think not. So I think I'll start sharing one every Friday...so without further ado...
"The Office Quote of the Week"
"What is it like being single? I like it. I like starting each day with a sense of possibility. And I'm optimistic, because every day I get a little more desperate - and desperate situations yield the quickest results." -Michael Scott
_____________________________
Check out this new button that Kellie made! I love the thought process...so funny, but so true! She's kind enough to share the code for several buttons she made, so go check them out here!
_____________________________
Speaking of stuff for your blog....you are cordially invited to check out my new layout! If you're reading via email or on a reader....pop on over and see what all the fuss is about. I changed things up a little with a new template from http://www.ourblogtemplates.com/ and designed a new header using a digital scrapbooking kit called Boom Chicka Wah Wah from Carrie Stephens. I have been playing with it on a test blog for a few days now, and thought I was good to go. Until I actually brought it over here...and yikes. Not so pretty. Fortunately my blog savvy friend Kellie helped me put the pieces back together, and now I'm loving it! I still have some things I'm playing with, but you get the idea.

On that note, I need to write posts that would be appropriate for the tabs at the top (about me, etc.) so will probably write them and backdate them. If they show up in your reader or inbox, just know the reason I'm writing these random posts is so I can generate content for these links. Unless anyone knows a better way? Educate me, please, if you do.


____________________________________


Seriously....I can't stop laughing at this!!
In case you can't read the caption, here is what it says: "Jodee Berry of Panama City, Fla., sits with her toy Yoda at her lawyer's office Wednesday. Berry, a former Hooters waitress, has sued the restaurant where she worked saying she was promised a new Toyota for winning a beer sales contest in April. Berry, 26, believe that she had won a new car, but she was blindfolded, led to the parking lot and presented a toy Yoda, the little green guy from Star Wars."

____________________________________

Happy weekend, friends!!! :)

August 20, 2009

Name Blocks

DIY Day @ ASPTL

For "do it yourself day", I'm sharing some name blocks I made for my bloggy friend Rebekah. Rebekah's blog was one of the first adoption blogs I came across when we were in the process of praying about pursuing adoption. Her story & relationship with her son's birthmother is absolutely amazing and inspiring...they are both incredible women of God. She is such a beautiful writer, and she ministered to me in more ways than she'll ever know. So when she received her son, I wanted to celebrate with her and sent her a care package. One of the things I included in the package were these name blocks.

Unfortunately I don't have step-by-step pictures of making them, but I'll try to give you the basics, as it's actually really simple and inexpensive!! :)

The actual blocks are cut from a 2 x 4. (which, as it turns out, is not truly 4"....go figure.) I think the board was like $2, and you can get it at Lowe's or Home Depot, where they will also cut it down for you if you ask! :) So I had them cut mine 4 inches wide. (It gives you tons of blocks - I think I got like 32 from the piece I bought, so plenty to use for other projects.)

The next step is to sand them. It just makes them a little easier to paint, and gives a nicer finish. After that, paint them the color of your choice. (In this case, I did brown - more on that later.)

Now for the designs: I just used digital scrapbooking paper & elements to match Ty's room. I originally designed them 4 x 4, but as previously mentioned - the height was not actually 4", but more like 3&5/8ish. But it was easy to re-size and re-print (I used cardstock).

So after that, I just cut them down to size, and used Mod Podge to put the paper on the block. Let it dry, then apply a coat over the top of the paper as well. I also Mod Podged (so not a word but you know what I mean) the entire block to give it a more finished look. And that's it! Very easy, super cheap, but such a fun, personalized gift! Here are a few close-ups of the blocks:


You can go to Rebekah's blog to see how she displayed them in baby Ty's room. (Isn't he a doll?!) And yes, his room is definitely in BLACK not BROWN as my crazy eyes had thought they'd seen in the pictures of his nursery. Oops! :)

I would be glad to share the template I used to create this with anyone who would like it - either leave a comment or email me at sjg_ou@yahoo.com and I'll send it your way. Happy DIY day! :)

Related Posts Plugin for WordPress, Blogger...

Enter your email address:

Delivered by FeedBurner


Loading...


Life Sweet Life

Designed By:

Munchkin Land Designs
 
Designed by Munchkin Land Designs • Copyright 2013 • All Rights Reserved
Blogging tips